
Modernisation Part 2: Options for Improvement
Modernisation, the process of updating and improving a process with the aim of making it better, be it more accurate or more efficient. One of my main goals at DAME is to see how we can improve on our old production methods and what additional tools or processes might be needed to do so.
Fortunately, the optimisation and automation of processes was also part of the work I did before helping to found DAME, so I have a lot of experience to draw from. However, as that experience is primarily focused on engineering, I have been adapting it to suit our needs and make our production methods more efficient without restricting our artistic freedom.
As this is not the easiest subject to cover, we will be breaking things down into smaller parts in order to explain our plan and thought process clearly. As such, this is the second of 4 blog posts that we have planned:
- The Old Method
- Options for Improvement
- What We Have Done
- Linking It All Together with Mask Generations

Options for Improvement
Now that we have had a look at the old process of making a mask, lets take a look at what different options there are for how it can be changed. This is not a full comprehensive list of what can be changed, rather it is a list of the main ideas that we have discussed and considered over the years. We hope to talk more about our experiences with these ideas in the next part of this blog series, but for now I wanted to explain what each process was, how it works and the pros and cons for us in using them.
Standardisation
So, lets start with what is likely the most boring answer for how we can improve; to standardise processes and/or parts.
To do this, we need to break the mask down into the different elements that comprise a finished mask, then look to see what is common between all masks. From there, we can see what changes can be made to standardise those elements, or parts, without impacting the result of the final product.
This will allow us to make those parts quicker due to there being less variation between each individual part of any given type, which in turn will also allow us to make some parts in advance, as well as improve their overall quality by removing the need to make them as one offs every time. We see the general benefits of standardisation as something that will benefit both us as a company and our customers at the same time.
Standard Designs
This is where we can take a part of an overall design and offer a range of standard options, allowing us to build more of the design into the manufacturing process, or to gain more experience with doing a task in a certain way, meaning that we will learn to do it quicker and better over time.
Pros:
- Less work to be done for every order as more work can be done once at the design stage
- Easier to buy materials needed in advance
- Easier for customers to see what the end result might look like
Cons:
- Limits what we can offer to customers
- Any options which deviate from the standard process will take longer and cost more
Templates
Once the concept of standard designs has been implemented, the next clear thing to implement are templates to make manufacturing each of the parts easier. This can range from moulds, features on moulds, plastic stencils or even a paper alignment tool, all of which give us the benefit of doing a bit of extra work at the design stage, or when we first make a part, to then save ourselves time and effort on every subsequent time that part is made.
Pros:
- Can save a lot of time when remaking complex items
- Can improve accuracy when doing tedious or difficult tasks
- Can reduce the effort needed to produce a part
Cons:
- All templates will need to be stored and shared with others who need them
- It can take a long time to produce a good template, sometimes a temporary one needs to be made first to test how it can be used
Standard Parts/Kits
Lastly, if we can standardise enough, it will allow us to create standard parts or kits that can be used. This may not sound to be that big of a deal, however once common parts are being used on a mask, it opens up the possibility of it being made in advance of the order being placed, allowing the order to be completed much quicker than before. This does not always reduce the amount of time required to fulfil the order though, as it instead allows us to be more flexible with our time.
For a lot of parts or kits, it is quicker to make multiple of them at the same time than it is to only make one, largely due to the time it takes to set up to do that task or clean up after it is finished being mostly the same regardless of how many times you may need to repeat the task. Therefore, it can be more cost effective to repeated it 5 times over, even if you only need to do so 3 times for the current orders, as then the next 2 orders are already ahead.
Pros:
- Simplifies stock and order management
- Balances workloads by allowing for parts to be made in advance during quite periods
- Allows for work to be done in bulk, which saves time compared to doing it as required
Cons:
- All kits need to be stored and moved to where they are required as they may not have been made by who needs them
Cutting Machine
As you may remember, not all parts of a mask are 3D objects and some are instead flat 2D shapes, for example the eyelashes are a 2D shape cut into EVA foam. If we could find a machine that could cut out the shape for us, it would allow for multiple areas of the mask to be improved.
Having a machine do the cutting for us would allow us to get a repeatable result with potentially more details than we would be able to do by hand. Additionally, it would allow us to work faster by working on something else at the same time as the machine is working.
We see 2 clear different routs to go down for this, either a Laser Cutter or a Cutter Plotter.

Laser Cutter
This is where a high-powered laser is used to cut away at the material by vaporising it. Usually, the material is put onto the cutting area, then a 2-axis cutting head moves across it. The laser is fixed but mirrors are used to direct it to the lens on the cutting head, which focuses it onto the material to create a fine point that then vaporises the material.
Depending on the material’s thickness, the lens might need to be refocused to ensure that the laser converges at the correct location within the material to leave the best cut possible, if not then the cut might be quite wide and the edge will not be as neat as possible. Depending on the material, the speed and power will need to be changed to try and ensure that it cuts all the way through and leaves a clean cut, without burring the material while doing so.
Pros:
- Does not require much regular maintenance to keep it running
- Can cut a wide range of different materials
Cons:
- Produces dangerous fumes when cutting that must be extracted
- Can leave behind burn marks
- Can set alight the material being cut!
Cutter Plotter
A plotter is a special kind of printer where a pen is used to draw onto the paper, usually the plotters head moves side to side on a beam and the paper is moved between it allowing it to draw in both directions. A cutter plotter works in the same way but instead of having a pen, it will instead have a knife allowing for it to cut. Usually these types of machines will work on a roll of material like paper or vinyl.
Depending on the machine, it may have multiple locations for pens and knifes, allowing for it to work with different colours or both cut and draw at the same time. Usually the pressure is changed depending on the material being cut and the tool is changed depending on the result needed.
Pros:
- Can have a very large maximum size
- Does not leave behind any burn marks
Cons:
- Knife blades needs to be regularly replaced depending on the material being cut
- Usually can only work with a very limited range of materials, though there are a few machines that can work with a larger selection
3D Modelling
As simple as it may seam in our current digital age, being able to take advantage of designing a mask or parts of a mask in 3D will provide major benefits for us, especially compared to designing everything by hand using more classical methods like sculpting it out of clay.
A lot of different options suddenly open up to us once we have a 3D design, but it also introduces its own issues of needing to be able to convert from the physical world into the digital space, then back into reality again. To get a physical object into the digital space, we can 3D scan it, while to get the object from the digital space into a physical object, we can 3D print it. Alternatively, we can use other methods like automated machining, an automatic lave or a CNC machine.
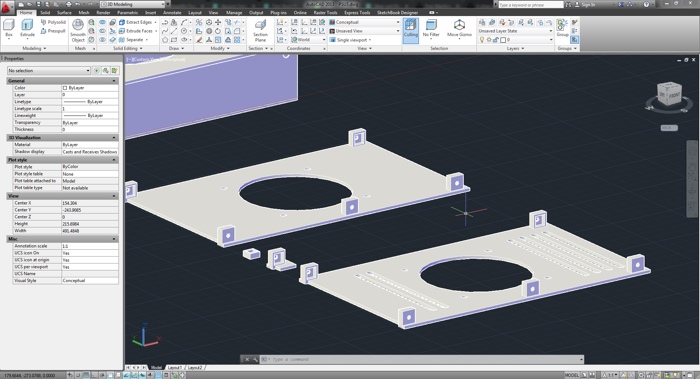
When we have a 3D file, it will allow us to easily review it from different angles and make changes where needed, something that is much harder to do with more classic methods. It is a lot easier to store or backup the 3D file, as well as pass it onto someone else to work on it, allowing us to truly work together on a design without needing to all be in the same location.
Pros:
- Easy to store, backup and give to others
- Easy to modify without time limits
- Can be version controlled allowing us to undo any changes
Cons:
- Cannot be used in isolation, but instead must be used with different processes to go to/from the digital space and real world
3D Scanning
If we have an object and we want to put it into a digital space, we can either measure it up and recreate it or look to scan in the object instead. 3D scanning the object will create a 3D model of it that can be used as a reference to design around, or as a good starting point when doing work. However, depending on the scanning method being used, the quality might not be good enough to use directly and will usually require some clean-up.
There are lots of companies out these offering 3D scanning services, with lots of different methods of scanning on offer from everybody, but to get the best out of 3D scanning we wanted to look into getting the capability to do it ourselves without needing to outsource the work to another company. This would allow us to scan objects as and when we need to, though this in-turn limited us to 2 main methods of 3D scanning that would be within our budget.
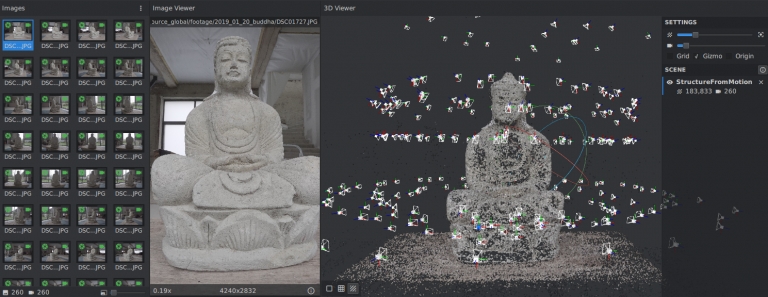
Photogrammetry
This is a process where you take a lot of different pictures of the object that you are scanning, from every angle possible and in good lighting, then feed them into a piece of computer software to be processed. The software will look at each picture and detect what are called “features”, a defined and unique element that is easily identifiable. Using these features, it can get a good idea of where each picture was taken from and can start to build up a 3D model of the space shown in the photos.
Depending on the level of detail required, a lot of effort might need to go into taking the pictures and hundreds of pictures of a single object may need to be provided to the software for processing.
Pros:
- Only a camera is needed, no specialised equipment required
- There is a selection of different software to use, some of which is free
- Can be used on very large objects or entire rooms
Cons:
- Can take a long time to generate the model after pictures have been taken
- Quality varies greatly depending on the image quality, lighting and coverage of all angles of the object
Structured-light Scanner
This is typically a handheld scanner that can be used to scan in small objects, it works by projecting a light pattern onto the object and then using a camera to detect that light pattern. While processing the camera feed, the software looks at the size of the light pattern to determine distance and how the pattern is warped to determine geometry, then recreates the object in a digital space, usually in real time.
Depending on the scanner used, the light might be visible, or it might be outside of the visible light spectrum to allow for a texture to be more easily created at the same time. Some scanners might use multiple cameras to help capture the shape of the object more accurately or include a laser scanner in conjunction with this process to improve the accuracy.
Pros:
- Can scan objects to a very high accuracy
- Usually you get to see a live preview of the scan, allowing you to check it is coming out well
Cons:
- Can be very expensive, £100’s for a cheap low-end model to £10000’s for an industrial scanner
- Can only scan small objects and usually must be held a set distance from them while doing so
- Is hard to scan reflective or dark objects due to scattering or absorbing the light
3D Printing
3D printing has been around for a long time now, though it has only been gaining in popularity a lot in recent years with the introduction of smaller, more cost-effective printers that can be used by hobbyists at home. This is usually one of the first things that comes into people’s heads when looking to turn a 3D model into a physical object.
There are many different types of 3D printers that all work in different ways. Each gives a different benefit or allows parts to be made in different materials, but they all generally follow the same idea of cutting the 3D model up into very thin slices or cross sections that, when stacked on top of each other, create the final 3D part. There are 3 main different methods or types of printers that we have been interested in over the years; there are many other types but generally people consider these 3 to be the most common.
There are lots of companies out there that can print objects for you from a 3D file, some will also help to finish the parts for you to make them easier to use once you receive them. We think that it is a good idea to both have internal capability to do some 3D printing, but also to look into external companies that specialise in it and can print at a much larger scale than we could internally.
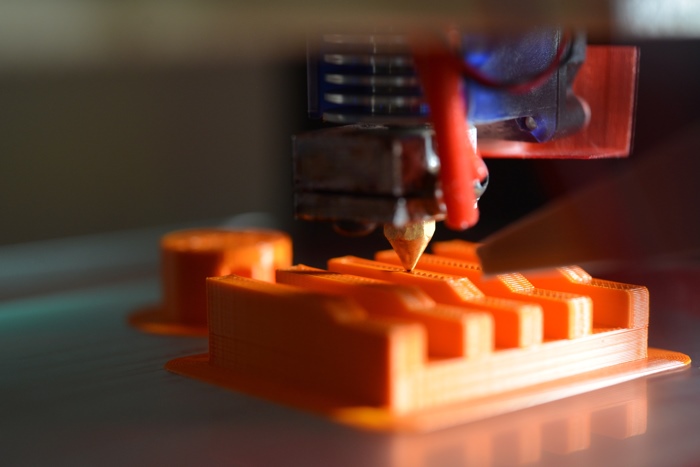
FDM - Fused Deposition Modeling
When you mention 3D printing, this is usually what people will think of and is commonly nicknamed filament printing. It is where a filament is fed into the machine to a print head that will melt the filament and eject it onto a print bed to draw the cross sectional shape, before the print head will move up a little bit and it prints the next layer of the object.
Depending on the machine, the print bed is usually heated to ensure that the part stays attached to the print bed while it is being printed, with it sometimes even being in an enclosure to allow it to print materials that require a higher temperature, as this prevents the part from warping while being printed.
As this is the most common form of 3D printing for hobbyists, there are a large range of different 3D printers and filaments available, making this both the most accessible form of 3D printing as well as allowing it to cater to a large range of different needs.
Pros:
- Wide range of plastics and machines readily available
- Can print large hollow objects without needing to drain excess materials
Cons:
- Depending on the plastic used, dangerous fumes can be given off while printing
- Parts can require a large amount of clean-up before they can be painted
SLA - Stereolithography
More commonly known as resin printing, this is likely the second method of 3D printing that will come into people’s minds. It is where the build plate is lowered into a pool of light sensitive liquid resin, with a powerful screen at the bottom of the pool. The screen will quickly show the cross section of the model to solidify the resin in the corresponding locations, before the build plate is then raised slightly and the next image is shown.
Once it has finished being printed, the parts will need to be washed to remove any excess resin from the outside before being fully cured using a UV light. There are small machines that are aimed at hobbyists, though due to the chemicals used and the use of UV light, a lot of people tend to avoid this type of printing despite it can be one of the best methods for printing highly detailed parts.
Pros:
- Parts can be printed to a very high level of precision
- Is the same time to print a layer of the object no matter how much is being printed, so can be quick to print multiple objects at the same time
Cons:
- Liquid resin is used, which being a hazardous chemical, precautions must be taken to prevent health issues
- UV light is used which can cause damage to skin
- All hollow objects must include drainage holes to allow for unused resin to be drained
SLS - Selective Laser Sintering
This is an interesting type of 3D printing, that is often overlooked, where a powdered plastic is used to print instead. The build area is covered with a thin layer of the plastic before a laser is then used to melt the plastic and fuse it into a solid shape, after the laser has traced out the shape of the cross section the build area will then lower, more powder is added and the process repeats until it has finished printing everything in the build area.
Unlike both FDM and SLA printing, this can print parts without any need for supports as the unused powder will support the objects being printed, making this a great process to print multiple objects at the same with minimal unused space.
Pros:
- Unused printing material will support the parts being printed, cutting down on waste material and clean-up
Cons:
- The surface finish is rough and requires work to make it smooth
- Depending on the plastic used, dangerous fumes can be given off while printing
- All hollow objects must include drainage holes to allow for unused plastic to be removed
Production Methods
In addition to 3D printing, there are other production methods that can be used, some of which might use 3D printing to create a master to make a mould, others where the 3D model might be used directly by a CNC machine to make a mould or forma to be used instead.
Injection Moulding
This is an extremely common process that is used to make most objects, it is where plastic pellets are melted down into liquid plastic before being injected into a mould. The mould is then opened up and ejection pins are used to push the part out of the mould before it is closed up and the process goes again. It is a good process to make a lot of the same part with little to no variation between them, though it is not the best of methods to use if there are going to be a lot of different versions of the same part.
The mould can be very complex, as it is required to come apart into pieces and includes moving pins that are used to help eject the finished part. This is all usually triggered automatically in sequence with the machine injecting the liquid plastic, so it can be very time consuming and expensive to make the mould and is something that we would not be able to make without external help.
Pros:
- Can produce high quality parts that require little to no finishing
- Can be ran fast for simple parts
- Can make multiple parts from 1 mould
Cons:
- Is expensive to make a mould
- Each new variant needs its own mould
- Cannot be used to make hollow parts
Roto Casting
This is a process where some liquid material is poured into a mould that then closes shut before beginning to rotate, evenly distributing the material around the walls of the mould as it solidifies. Sometimes, the mould is heated or cooled to help the material to set quicker, however if it sets too quickly, the material will not be evenly distributed. Additionally, if you stop rotating the mould too soon, any remaining liquid will pool in the bottom of the part.
This process is great at making solid objects with no openings and is sometimes used to create shapes out of chocolate like Easter Eggs. Depending on the material used, the moulds can vary greatly from a simple plastic tray to a milled metal mould, but generally speaking they are a 2-part mould with some alignment pins to ensure that the 2 halves can quickly be put together.
Pros:
- Can be used to make hollow objects with no openings
Cons:
- Is not very useful for other shapes
Fiberglass Vacuum Moulding
This is a method for making objects out of fiberglass, however it differs from the hand layup method that we described in part 1. It follows a similar process, though in addition to the mould being used, it is inside a bag that the air can be pulled out of to help to push the layers together, try and remove any air bubbles and remove any excess resin. In addition to this, heaters are usually used to help to control the reaction of the resin as it sets, to ensure that it all sets at the same time and reduce the chance of warping.
While the mould used is similar to one that would be used for the hand layup method, parts made using this process typically tend to be lighter, stronger and generally of a higher quality, as the vacuum process will push the fiberglass against the walls of the mould to leave a better surface finish. This means any work done to improve the mould will save time on finishing the parts that are created using this process.
Pros:
- Results are stronger and lighter when compared to hand layup method
- Surface finish is improved, usually with less air bubbles compared to hand layup method
Cons:
- Liquid resin is used, which being a hazardous chemical, precautions must be taken to prevent health issues
- Cannot be used to make hollow parts
- Machine requires constant maintenance to ensure vacuum pressure is maintained
Vacuum Forming
This is where a sheet of plastic is heated up under a heater, before being lowered down onto a forma (a positive mould). A pump is then turned on to try and create a vacuum that will pull the soft hot plastic into the forma to help get it into all of the corners of the mould. Once given time to cool, it can then be removed from the machine and all excess plastic is cut off before the edge if finished to make it safe.
This can be a good method to mass produce parts with a low entry cost, as the forma is commonly made out of wood and can be produced using a CNC machine from a 3D file, or made using more traditional woodworking methods, but it has the limitation of needing to have the base of the forma being its widest point, limiting the shapes that this can produce.
Pros:
- Cost effective to set up and run
- Fast process
Cons:
- Resultant object is not a uniform thickness as the material is stretched down the forma unevenly depending on its angle to the plastic
- Objects must have an open side which is cannot be smaller than the forma used / No overhangs
- Only works with a thermo plastic, meaning it will warp if heated up
Conclusion
All in all, we hope this has shed light on many of the different processes that we believe can be incorporated into our mask making process in order to improve both quality and efficiency. In the next part of this blog post series, we will be talking about our experiences with some of these processes and what it was like using them.