
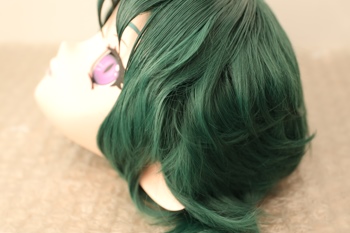
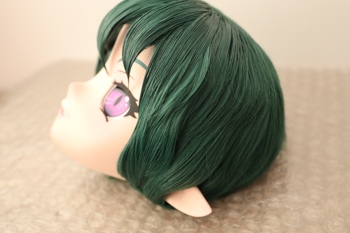
Changing a wig on a Gen 3 Mask
Our "Gen 3" masks have had removable hair since we launched them over 2 years ago, though we have only recently noticed, thanks to a customer asking us how to go about changing the wig on their mask, that nowhere on our site do we actually explain how the removable hair works. So, seeing as said info will be a helpful resource for all of our customers, lets fix that!
Short Answer
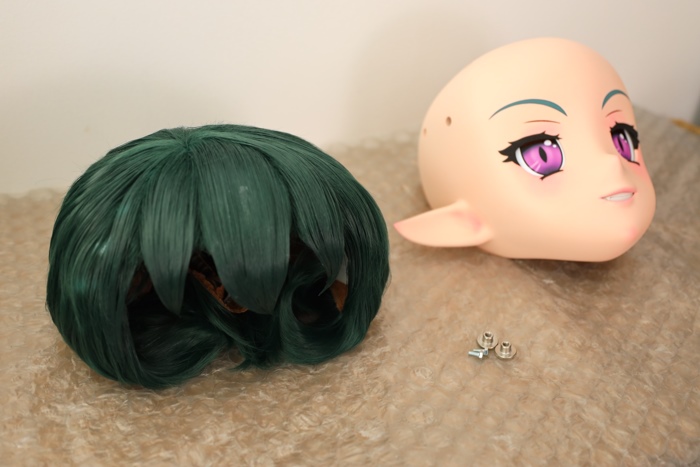
Our wigs attach using bolts so, whilst we find that only 1 is technically needed to hold the wig in place, we recommend using 2 bolts on opposite sides of the mask to ensure that it is secure and does not move. For this reason, when you buy a mask or a separate wig, we will always supply 2 bolts and 2 knurled nuts to secure them.
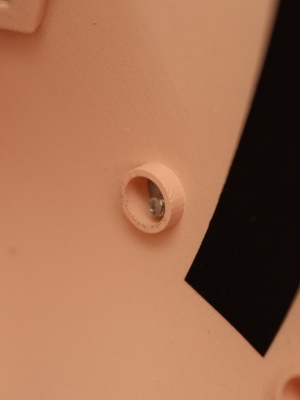
To remove the wig, we recommend that you first put the mask upside down on some bubble wrap, so you can more easily access the inside where you will be able to see the knurled nuts, small metal knobs that you can undo by hand. Once you have removed the nuts, you will see the end of the bolts; push on them from inside the mask, then part the hair to find the bolt and fully remove it. Once done, then you should be able to lift the main body of the mask, the shell, away from the wig.
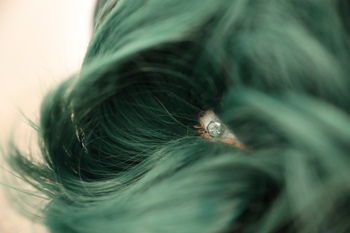
To put a new wig onto a mask, first place the wig upside down on bubble wrap, then lower the mask shell into it. You will see a rectangular hole in the mask shell and a corresponding peg on the wig, move the mask around until the peg fits into that hole. From there, dig around in the wig to find the holes for a bolt. These will be surrounded with a hexagon-shaped wall for the head of the bolt to slot into, push the bolt in until the head is half covered up by that wall, then on the inside of the mask, start to screw the knurled nut onto the bolt. You may need to wiggle/twist the mask a little if the bolt is not centred in the hole when pushed into place. Once both bolts are in place, then turn the mask the correct way up and brush the hair as needed.
Long Answer
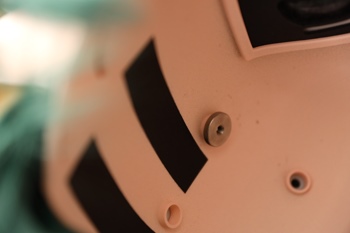
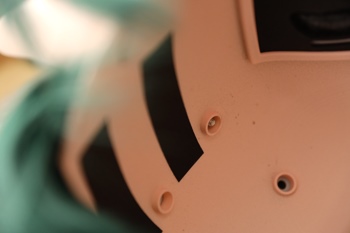
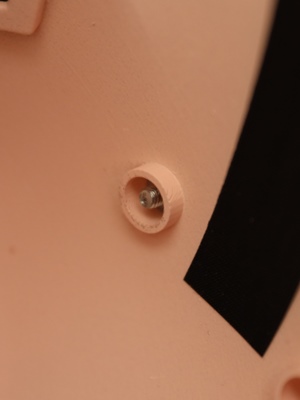
Our wigs are glued down onto a solid wig plate, mainly to help make it easier to swap the wigs, but also to help keep any hair styling from being destroyed when the wig is removed. The wig plate has a total of 15 holes that can be found by carefully digging through the wig, with each hole can being usable for either securing the wig to the mask shell or for mounting accessories to the mask. They work by having a hexagon-shaped wall that traps the bolt to prevent it from spinning, then having a corresponding hole in the mask shell that a knurled nut slots into. This allows you to change the wig or add accessories to your mask without needing any tools to do so, though we do still heavily recommend placing some bubble wrap down on whatever surface you are using when making changes to the mask.
Removing an old wig:
First, lay the mask down, making sure the top of the head is against a soft work surface. We recommend laying some bubble wrap on a table, but using something like a bed, blanket, etc. is also fine.
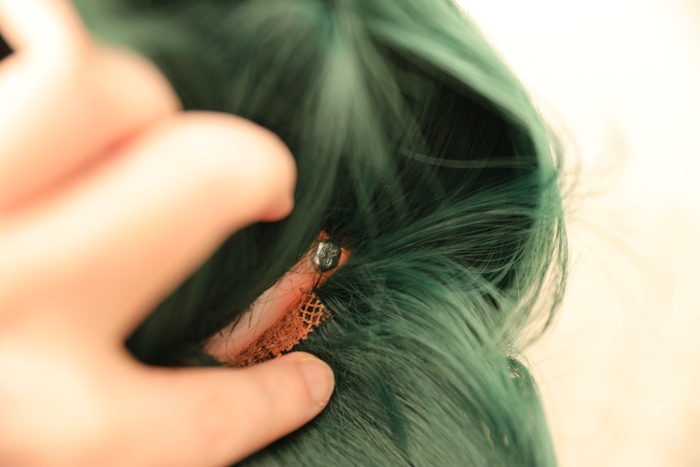
Once the mask is laid down, unscrew the nuts on the inside of the mask and put them to one side, then remove the bolts in the wig and put them with the nuts. You will need to run your fingers through the hair and feel about for the head of the bolt, then push on them from the inside of the mask to pop them up and remove them.
- After both the nuts and bolts have been removed and set aside, carefully pull the mask shell out of the current wig and set it down next to it, then move said wig somewhere safe.
- We recommend making sure you have somewhere to store the wig that is not in use before swapping them.
If one of the wigs has a hard/set hair style, we also recommend find something it can sit on when not in use, as it is best not to store the wigs upside down and any hard styling may get damaged over time if the wig is left unsupported.

Installing a new wig:
- When the first wig has been moved out of the way, retrieve the new wig and lay it in the same position as the previous one, then slot the mask shell into the new wig.
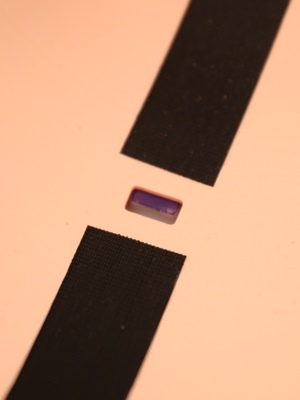
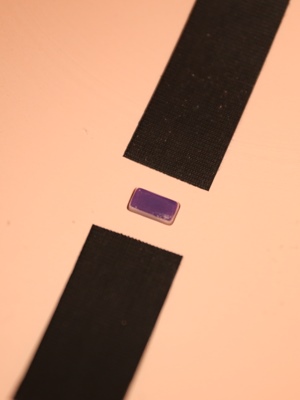
- You will know once the shell has been slotted in correctly, as a locator peg on the wig will slot into the rectangular hole in the top of the head (it has a purple tip, so should be fairly easy to see when it’s in the right place).
Some hair may get folded over/caught between the mask shell and the base of the wig when putting them together, so make sure there is no trapped hair before moving on to the next step.
- Once you are happy that the mask shell is in the correct place, insert the bolts that you removed from the previous wig into the new one. You may need to spend a couple of minutes moving your fingers through the hair to find the bolt locations, as you need to make sure that the bolts sit in the hex-shaped slots correctly.
- Our masks have a lot of different bolt locations, so you don’t need to use the same holes as the first wig, however we would still strongly recommend that you use a pair of bolts + nuts to secure the wig onto the mask shell whenever you change it.
- All separate wigs come with two pairs of nuts and bolts, but we just recommend keeping these as spares, as you do not need more than two pairs to secure a wig.
If you are struggling to find the holes in the wig, you can always poke a small stick, like a chop stick, through the hole from the inside of the mask to help locate them.
- When you've correctly put the bolts into the holes in the wig, place one finger on the top of a bolt to make sure it stays in-place, then screw one of the nuts onto it on the inside of the mask.
One thing to note is that the first bolt may sit slightly off-centre when it pokes through into the mask. You should just be able to start screwing a nut on to realign/centre it, however there is small chance you may need to wiggle the mask shell slightly to shift how its sitting in the wig before you can screw on either of the nuts.
Repeat this for the second bolt and you're done! Though, once you’ve got the wig securely attached, you will almost definitely need to brush the hair out to get it sitting neatly again.
Conclusion
Hopefully this helps to explain how to swap the wigs over on our masks, and possibly gives you ideas on how easy it would be to swap from a long hair wig to short hair with ponytails, for example. If you have any further questions or would like any additional information, feel free to contact us and we will help you as much as we can.